
How to Enable File Uploads in Framer Forms
Easily connect external storage—such as Cloudinary, Google Drive, Supabase, or Cloudflare R2—and add a file upload feature to your Framer forms.
Posted by

Want to add file uploads to your Framer forms? This guide will show you exactly how to set it up.
The setup is simple. Add the File Upload Form component inside your form, then connect it to an external storage provider. You can also customize the design to match your project.
*You will need the File Upload Form component to follow this guide.
Use Cases
Quick Public Uploads
If you just need to collect public or low-risk files, start with a direct upload provider. This is the fastest way to receive images, PDFs, event materials, portfolio files, or simple contact form attachments.
For this kind of workflow, Cloudinary, Google Drive, or Supabase Direct can be enough.
Secure Production Uploads
If users are uploading sensitive files, private documents, customer-specific assets, legal files, or anything that should not be publicly accessible, do not upload directly from the browser using secret credentials.
For production-grade uploads, use Cloudflare R2 Worker, a Supabase Edge Function, or a Custom Endpoint. This gives you a server-side layer where you can validate the file, check the user, protect secret keys, and control what happens after upload.
Which Storage Should You Choose?
Storage | Best for | Setup | Security |
|---|---|---|---|
Cloudinary | Images, PDFs, media files, and fast public uploads | Easy | Medium |
Google Drive | Saving uploaded files into your own Drive folder | Easy | Medium |
Supabase Direct | Public or low-risk uploads into Supabase Storage | Moderate | Low to medium |
Cloudflare R2 Worker | Scalable storage with server-side validation | Moderate | High |
Custom Endpoint | Sensitive files, private flows, authentication, and custom logic | Advanced | High |
Option 1. Cloudinary (Recommended)
Cloudinary is the easiest direct upload option. It is a good fit for images, PDFs, media files, and lightweight public upload flows.
Step 1. Prepare Cloudinary
Create a Cloudinary account, find your Cloud Name, and create an unsigned upload preset. If you need to upload PDFs or ZIP files, make sure PDF and ZIP delivery is allowed in your Cloudinary security settings.
Step 2. Fill in the Component Settings
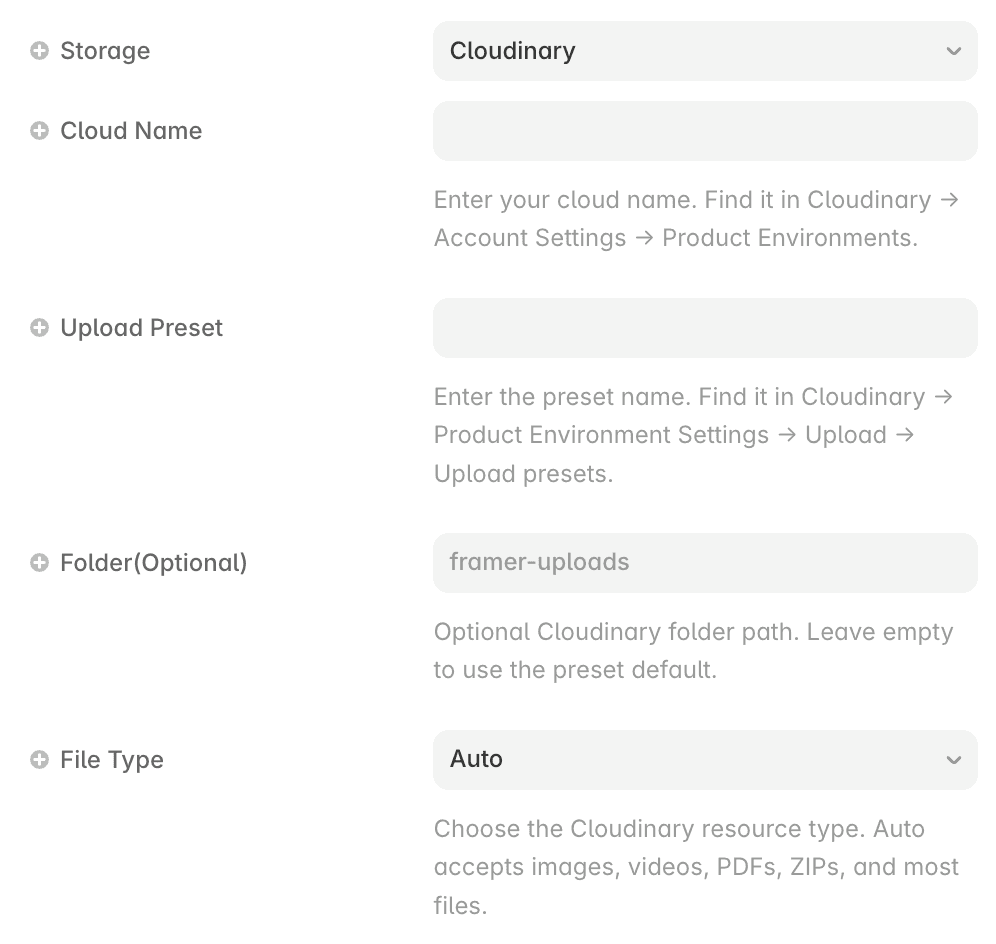
In the component settings, fill in
Cloud Name
Enter your Cloudinary cloud name.
Upload Preset
Enter Your unsigned upload preset.
Folder
Optional. Use something like framer-uploads if you want to keep files organized.
Option 2. Google Drive
Google Drive mode uses Google Apps Script as a bridge between your Framer site and your Drive folder.
The flow is: Framer component → hidden iframe form → Google Apps Script Web App → Google Drive folder → file URL returned to the component.
Step 1. Create a Google Drive Folder
Create the folder where uploaded files should be saved. The folder itself does not need to be public. The Apps Script runs using the Google account that deployed it, and each uploaded file can be shared individually with anyone who has the link.
Step 2. Create the Apps Script
Open Google Apps Script, create a new project, and paste in the code from googleAppsScriptDriveUpload.gs. Then update the folder value at the top.
You can use either the full folder URL or only the folder ID.
Step 3. Deploy as a Web App
In Apps Script, create a new Web App deployment. Set Execute as to Me, and set Who has access to Anyone.
After deployment, copy the Web App URL that ends with /exec. Do not use the /dev URL or the Apps Script editor URL.
Step 4. Fill in the Component Settings
Upload URL
Paste your Google Apps Script Web App /exec URL.
Result Path
Use url.
Apps Script is convenient, but it is not ideal for very large files or high-frequency production uploads. For sensitive files, use a custom endpoint instead.
Option 3. Supabase Direct

Supabase Direct uploads straight from the browser into Supabase Storage. It is useful for public or low-risk files, but you need to understand your bucket and RLS policies.
Step 1. Prepare Supabase
Create a Supabase project, create a Storage bucket, and find your legacy anon public JWT key. For quick testing, a public bucket is the simplest starting point.
Step 2. Fill in the Component Settings

Supabase URL
Enter your project URL, such as https://your-project.supabase.co.
Supabase Key
Enter the anon key.
Bucket
Enter the bucket name
Folder Path(Optional)
Enter the folder path inside the bucket, such as uploads or form-submissions.
Step 3. Add Storage Policies
Add an insert policy for uploads:
If the files need public URLs, also add a read policy:
Replace uploads with your actual bucket name.
Avoid Supabase Direct for ID documents, contracts, sensitive resumes, customer-specific private files, and medical, legal, or payment-related documents. For those cases, use an Edge Function or Custom Endpoint.
Option 4. Cloudflare R2 Worker
Cloudflare R2 is a stronger option when uploads need a server-side layer. Instead of exposing storage credentials in the browser, the component sends the file to a Worker, and the Worker stores it in R2.
The flow is: Framer component → Cloudflare Worker → R2 bucket → public file URL returned.
Step 1. Prepare Cloudflare
Create an R2 bucket, create a Worker, add an R2 bucket binding to the Worker, and set up an R2 public URL or custom domain.
Step 2. Configure the Component
Storage
Select Cloudflare R2 Worker.
Upload URL
Paste your Worker URL.
Step 3. Return the File URL
Your Worker should return JSON like this:
For production, add max file size checks, allowed file type checks, allowed origin validation, CAPTCHA or token verification, and rate limiting.
Option 5. Custom Endpoint
Custom Endpoint is the most flexible upload mode. You can use your own server, a Vercel route, a Netlify function, a Supabase Edge Function, a Cloudflare Worker, or any endpoint that accepts a file and returns JSON.
Endpoint Contract
The component sends a POST request with multipart/form-data. By default, the file field is file.
Your endpoint should return the final file URL:
Use This Mode When
Use a custom endpoint when you need login validation, private files, secret keys, file type validation, file size validation, virus scanning, rate limiting, database writes, email notifications, or CRM integrations.
Security Checklist
Never put private credentials inside browser-side component settings.
Do not expose a Supabase service role key.
Do not expose a Supabase secret key.
Do not expose a Google private key.
Do not expose a Cloudflare API token.
Do not expose an AWS secret key.
Browser-side values can include a Cloudinary unsigned upload preset, a Supabase anon public JWT with correct RLS policies, a public upload endpoint URL, or a Google Apps Script Web App /exec URL.
Troubleshooting
Cloudinary PDF link does not open
Allow PDF and ZIP delivery in Cloudinary, use Cloudinary Type: Raw, and upload a fresh test file.
Supabase InvalidKey
Check that your key starts with eyJ, belongs to the same project as your Supabase URL, and that the Bucket field contains only the bucket name.
Supabase RLS error
Add an insert policy on storage.objects. If you need public file URLs, also add a select policy.
Google Drive upload times out
Make sure the Web App URL ends with /exec, access is set to Anyone, Execute as is set to Me, and you deployed a new version after code changes.
R2 upload succeeds but the link returns 401
The object may be stored, but the returned URL is not publicly accessible. Set up R2 public access or a custom domain, then update the Worker PUBLIC_BASE_URL.
